How to Build Your Own AR Chess Demo For Meta Quest in Unity
Version/Date: 23.11.2023
Table of Contents
Introduction
This project is not only a showcase of the augmented reality (AR) capabilities of the Meta Quest headsets but also a guide on applying this technology in your Unity projects.
Project Goals:
- AR Showcase: Demonstrate the AR features of the Meta Quest Pro headset through an immersive chess-playing experience.
- Educational Value: Serve as a learning tool for developers interested in integrating AR into their Unity projects, providing insights into AR development practices provided by Meta.
Objectives:
- Chess Gameplay: Implement a fully functional chess game in AR
- Interactive Elements: Introduce interactive elements, such as hand gestures, to teach developers how to enhance user engagement in AR experiences.
- Documentation: Provide documentation to guide users, developers, and researchers through the features, functionalities, and technical aspects of the Chess AR Demo and offer insights into replicating similar AR interactions in their own Unity projects.
For Developers:
If you are a developer interested in integrating AR capabilities into your Unity projects, this documentation will guide you through:
- Setting up your Unity environment for AR development.
- Understanding and implementing interactive elements in an AR context.
- Leveraging Meta Quest Pro features for an enhanced AR experience.
Requirements
- Hardware:
- PC running Windows 10
- Meta Quest Pro or Quest 3
- USB type-C cable
- Software:
- Oculus/Meta Developer Account
- SideQuest
- Unity
Instructions: How to Re-create the Demo
Create a Unity Project
Create a regular 3D Unity Project in the Unity Hub.

Note: There is no need to select the “VR” template since we will include the necessary packages in the following steps.
Set up your Unity environment for AR development
Enabling Augmented Reality in your Unity project is achieved by integrating Meta's Passthrough. You need to enable it first to be able to see your environment (instead of an empty scene). After passthrough mode is enabled you can continue working on the rest of the AR demo.
To enable passthrough mode you need to follow the steps based on Meta's passthrough tutorial:
1. Install Oculus Integration Package
- Go to Oculus Integration SDK in Unity's asset store page and add it to your Unity assets.
- On the menu, go to Window > Package Manager.
- On the top menu, under Packages, select “My Assets”.
- Click Import.

- Select all files for importing.

Note: The Oculus Integration Package has been deprecated since the creation of this demo. There is a new SDK called Meta XR All-in-One SDK which contains all Meta SDKs (similar to the Integration Package).
2. Set Target Platform to Android
- Follow step 2 from Meta's passthrough tutorial
- Oculus Integration SDK in the Package Manager:


3. Apply Configuration Settings
- On the menu, go to Edit > Project Settings > Player, and then expand the Other Settings tab.
- Under Rendering, set the Color Space to Linear.
- Under Configuration, In the Scripting Backend list, select IL2CPP.
- Clear the ARMv7 checkbox and instead select the ARM64 checkbox.


4. Install Oculus XR Plugin
- On the menu, go to Edit > Project Settings, and then select XR Plug-in Management. Note: If XR Plug-in Management is not installed, install it before you proceed with the next step.
- From the Plug-in Providers list, select the Oculus checkbox.

- From the left navigation pane, select Oculus.
- Under Target Devices, select the Meta Quest headset you’re using for the tutorial.


Note: For Meta Quest Pro, which has eye tracking, you can set the Foveated Rendering Method to the Eye Tracked option. Read more on Meta's website.
5. Connect Meta Quest Headset to Computer
By connecting the headset to the computer you will be able to quickly build and run your project directly to the device for testing purposes.
- Connect the headset to the computer using a USB-C cable and put on the headset.
- Click Allow when prompted to allow access to data.
- To verify the connection, open the Unity project, and then on the menu, go to File > Build Settings.
- From the Run Device list, select the Meta Quest headset. If you don’t see the headset in the list, click Refresh.

- If the headset still doesn't appear in the devices list, you can check the device connection status on SideQuest. If the status color is not green, then follow the instructions from SideQuest to fix the issue.

6. Set OVRPlugin to OpenXR
On the menu, go to Oculus > Tools > OVR Utilities Plugin, and then set OVRPlugin to OpenXR.

7. Add OculusInteractionSampleRig
OculusInteractionSampleRig is a prefab from the Interaction SDK that contains the OVRCameraRig and InputOVR. Since OVRCameraRig is a replacement for Unity’s main camera, you can delete Unity’s main camera from the Hierarchy tab. OVRCameraRig gives access to OVRManager, which is the main interface to the VR hardware. InputOVR is useful for configuring hand interactions which we will go over in this tutorial.
- On the Hierarchy tab, right-click Main Camera, and click Delete. Also, delete Directional Light. The scene should be empty.
- On the Project tab, search for OculusInteractionSampleRig, and then drag and drop the OculusInteractionSampleRig prefab into the scene. You can also drag and drop it in the Hierarchy tab.
8. Integrate Passthrough
- On the menu, go to Window > Rendering > Lighting, and then on the Environment tab, in the Skybox Material, select None. Repeat for Sun Source. You can also type None in the search box to quickly set the skybox material to none.

- On the Hierarchy tab, select OVRCameraRig, and then on the Inspector tab, do the following:
- Under the OVRManager, under Tracking, set the Tracking Origin Type to Floor Level. (To place the camera at eye-level, which is necessary when using Hand Tracking)
- Under the OVRManager, under Quest Features, on the General tab, for the Passthrough Support option select Supported.
- Under the OVRManager, under Insight Passthrough, select Enable Passthrough to initialize passthrough during app startup.
- Click Add Component, and then from the list, select OVRPassthroughLayer script.
- Under the OVRPassthroughLayer script, set the Placement to Underlay.

- On the Hierarchy tab, expand OculusInteractionSampleRig > OVRCameraRig > TrackingSpace > CenterEyeAnchor, and then on the Inspector tab, do the following:
- From the Clear Flags list, select Solid Color.
- Change the Background color to black and the alpha value to 0. You can also set the (R,G,B,A) values to (0, 0, 0, 0).


Import the Chess Set Asset
Now it's time to import the Chess Set Asset that I used to model the board and the chess pieces.
- Add “Free Low Poly Chess Set” to your assets on the Unity Asset Store.
- Go to Package Manager, select “Free Low Poly Chess Set” under My Assets, and import it into the project.

- Go to Project, under Assets > Free Low Poly Chess Set > Example > Scenes, open the ChessDemo scene.
- Observe how the board and pieces gameObjects are ordered in the Hierarchy Tree.
- Add the board and chess piece prefabs to your project Scene in a similar way.


Note: The chessboard and the chess piece objects might appear distant and oversized when running the project first time. Play with the position and scale values in the “Transform” component of the object to adjust its size and relative initial position.
Set Up Hand Tracking
Hand tracking enables the use of hands as an input method for the Meta Quest headsets. By using hand gestures in combination with Augmented Reality it is possible to play chess in a more natural and immersive way compared to other forms of digital chess games. Multiple basic interactions can be performed through hand tracking (targeting, selection, manipulation). This demo focuses on manipulation. For example, you can grab the chess table to relocate it or pinch the chess pieces to move them on the table.
That being said, you need to take into consideration that the current hand-tracking technology also has its limitations. Therefore, it is possible to have issues with occlusion when the lighting is dim or part of the hand is not visible. Also, occasionally you may encounter accidental triggers when trying to perform specific hand gestures.
Select Hands as Input
- On the Hierarchy tab, select OculusInteractionSampleRig > OVRCameraRig to open the Inspector tab.
- On the Inspector tab, go to OVR Manager > Quest Features, and then in the Hand Tracking Support list, select Controllers and Hands.
- Select the “Hands Only” option to use hands as the input modality without any controllers.
Set up Hand-centric interactions
Adding hand-centric interactions in your project is accomplished by employing the Interaction SDK, which is included in the Integration SDK that we downloaded earlier. All the interaction models are done through a pair of Interactor-Interactable components. The Interactor components, like the hands, act on interactable components, like the chess pieces. To find more, read this blog about Interaction SDK
Set Up Hand Grab Interactor
A Hand Grab interaction uses per-finger information to inform when a selection should begin or end. The interaction has two components, Hand Grab Interactor, which is attached to each hand via the HandGrabInteractor prefab, and Hand Grab Interactable, which is attached to each grabbable object. Read more...
- On the Project tab, search for HandGrabInteractor, and then drag & drop the prefab to OculusInteractionSampleRig > InputOVR > Hands > LeftHand > HandInteractorsLeft
- Rename the prefab to HandGrabInteractorLeft
- In the Hierarchy tab, select HandGrabInteractorLeft (The Inspector tab should appear on the right)
- Drag the LeftHand gameObject (OculusInteractionSampleRig > InputOVR > Hands > LeftHand) from the Hierarchy to the Hand field under Hand Ref (Script) on the Inspector tab. Doing this will map the grab interaction to the hand object.

- Go to OculusInteractionSampleRig > InputOVR > Hands > LeftHand > HandInteractorsLeft, then on the Inspector tab, go to Best Hover Interactor Group (Script) component and add a new element to the Interactors list parameter. (Click the “+” button on the right bottom corner)
- Drag & drop the HandGrabInteractorLeft object from the previous steps to the new element in the Interactors list.

- Now, repeat the previous steps for the right hand at OculusInteractionSampleRig > InputOVR > Hands > RightHand.


Add Hand Grab Interactable to Objects
The “Hand Grab Interactable” component, which goes on the grabbable object, indicates not only whether the object can be grabbed, but how it can move with the interactor, which fingers should start and end the grab, and how the hand should align to the object. Read more...
- Select the chessboard or chess piece GameObject that you want to make interactable (e.g. RookLight)
- Go to the Inspector Tab, then click “Add Component”, then add the following components in this order:
- “Rigidbody”
- Used by the “Hand Grab Interactable” component to move the object
- “Capsule Collider”
- Defines the area that triggers the interaction for this interactable object when your hands collide with it
- “Grabbable”
- Makes the GameObject rotate, scale, or transform when you interact with it. Read more...
- “Hand Grab Interactable”
- The “Pointable Element” parameter should be auto-wired to the Grabbable component
- The “RigidBody” parameter should also be auto-wired to the Rigidbody component
- On the Rigidbody component uncheck “Use Gravity” and check “Is Kinematic”.
- Otherwise, the object will fall out of the scene.
Congratulations, now you should be able to grab, pinch, and palm the interactable chessboard and chess piece objects that you worked on in the previous steps.
Note: Feel free to test these interactions by building and running the project on your headset through Unity. To accomplish this:
- go to File > Build Settings, then select your headset for the “Run Device”.
- Click “Build And Run” to save the APK file locally and automatically run the project on your Meta Quest.
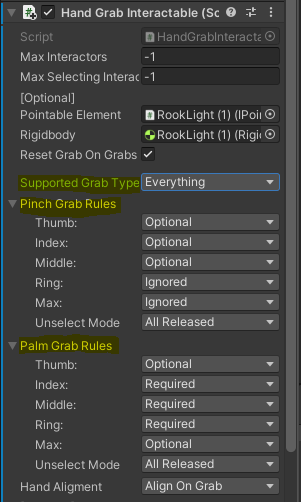
Specify Supported Grab Type
You can also specify which type of grabbing a grabbable object supports. By default, it supports all grabbing types, however, you might want to allow only pinching for chess pieces or grabbing for the chessboard. To change the setting:
- Select one of the chess piece GameObjects from your scene, then go to the “Hand Grab Interactable” component on the Inspector tab.
- Select the desired grab type in the “Supported Grab Type” parameter of the “Hand Grab Interactable” component.


In addition, you can set the requirements for each finger when pinching and/or palming. By playing with these requirements, you could, for example, allow piece pinching only with the index finger and the thumb. To do so, modify the Pinch/Palm Grab Rules from the “Hand Grab Interactable” component.
Implement Two Hand/One Hand Grab Transformers
In this demo, the type of transformations (relocations) that you can do on the chessboard object is determined by the Transformer components that are attached to the Grabbable component of its GameObject. The are two Transformer component types:
- One Hand Grab Transformers (when grabbing with one hand)
- Two Hand Grab Transformers (when grabbing with two hands).
By default, a Grabbable object uses a TwoGrabFreeTransformer and a OneGrabFreeTransformer which allow you to update the object's position and rotation freely on all axes when grabbing it with either one or two hands. In this demo, the chessboard uses:
- OneGrabTranslateTransformer to be able to relocate the board when grabbing it with one hand (but not its rotation or scale).
- TwoGrabPlaneTransformer to update the board's position, scale, and rotation about its Y-axis
- It uses optional constraints to limit the Min and Max Scale when resizing the board so that it doesn't appear too large or becomes too small to be usable. Read more...
To apply these Transformers to the chessboard:
- Select the chessboard GameObject, go to the Inspector tab
- Click “Add Component” on the bottom of the tab and add the “OneGrabTranslateTransformer” component
- Now, add the “TwoGrabPlaneTransformer” component
- Go to “Grabbable” (Script) component in the Inspector tab, then open its “Optionals” collapsable menu.
- Drag & drop the “OneGrabTranslateTransformer” component (from step 2) to the “One Grab Transformer” parameter in the Optionals menu
- Drag & drop the “OneGrabTranslateTransformer” component (from step 2) to the “Two Grab Transformer” parameter in the Optionals menu
- Go to the “TwoGrabPlaneTransformer” component on the Inspector tab, then under Constraints > Min Scale, set the value to 0.01
- Under Constraints > Max Scale, set the value to 3
![]()
Add Interactable Event Wrapper
We need to detect when a chess piece object has been unselected to call the function that will determine if the chess piece will move to a new square (and possibly capture an enemy piece), or if it will return to its last valid square. To trigger this function we will use the “InteractableUnityEventWrapper” component which we will use to raise our custom OnGrabEnd() function when the chess piece object leaves the “Select” state. Read more...
- Select the chess piece GameObject from your scene, then to the Inspector tab
- Click “Add Component” on the bottom of the tab and add the “InteractableUnityEventWrapper” component
- Drag & drop the currently selected chess piece GameObject (from the Hierarchy tab) to the “Interactable View” parameter inside the “InteractableUnityEventWrapper” component
- Click on the “+” from the “When Unselect” options, then Drag & drop the currently selected chess piece GameObject to the Object parameter
- Select the OnGrabEnd() function from the PieceController Script on the right
Chessboard Layout And Game Implementation
This demo uses a custom implementation to track the position of the chess pieces relative to the squares on the board. I've used the Board prefab from the Free Low Poly Chess Set as the parent object for the chess pieces and for all the custom scripts related to them. The board object contains eight children objects that represent the columns on the chessboard marked from A to H. Each column object has eight children, each named starting with the letter of their column and ending with their row index within that column (e.g. A1, A2 … A8). Observe the layout from this top-bottom view:

Board hierarchy structure:
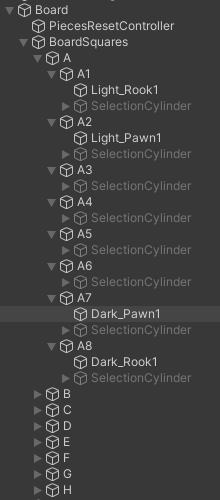
As you can see in the screenshot, each chessboard square object has a SelectionCylinder object and some of them also have a chess piece object. The chess piece GameObjects are assigned to their parent square based on their real-life starting positions. The SelectionCylinder serves as a visual effect to highlight the currently selected board square. Each chessboard square object has a Box Collider component which triggers a collision when it collides with a chess piece. When this collision happens, the OnTriggerEnter() function from the custom PieceController script is called.
    private void OnTriggerEnter(Collider other)
    {
        if (other.transform.parent.parent.name == "BoardSquares")
        {
            Debug.Log("Entered square: " + other.name);
            other.gameObject.transform.Find("SelectionCylinder").gameObject.SetActive(true);  // activate highlight
            SetHoveredSquare(other.gameObject);
        }
This function visually highlights the square by activating its SelectionCylinder child object. Internally, PieceController keeps track of the currently hovered square and moves the chess piece to that square if the square is either free or has an enemy piece that can be captured. If you capture an enemy piece, it will be deactivated. If you un-grab a piece while there is no highlighted square, the piece will snap to its last valid position. You can examine the custom scripts in the GitHub repository for this demo (link in Code section).
Code
- Unity Project Repository: https://github.com/utwente-interaction-lab/ChessAR
- All custom scripts can be found in the repository under /Assets