Resonite - Rowing Reimagined
Version/Date: 02/05/2024
Overview
The Rowing Reimagined project, developed at the University of Twente's Interaction Lab, aims to create an immersive virtual reality (VR) rowing simulation experience using the Resonite platform. The goal is to allow users to practice rowing techniques and participate in virtual rowing events within a collaborative VR environment, this wiki article is designed to allow students/ PHD/ Researchers to demo the Rowing project, please note there is a fair amount of pre-requisists to setting up this demo, feel free to contact the Interaction Lab knowledge base team for further assistance.
Setup
Before proceeding with the setup ensure you are familiar with how to use VR, SteamVR and Resonite.
- Ensure a SteamVR compatable headset is connected - Valve Index Setup Wiki
- A UT connected account is used for Resonite - Tutorial
- RP3 Rowing machine + SDK - see below
- x3 Tundra trackers connected to SteamVR - see below
Usage
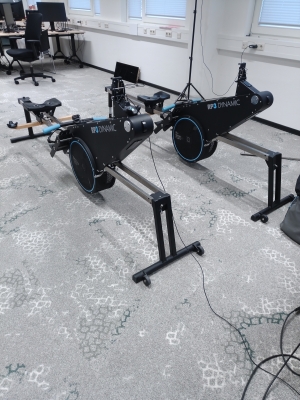
- Ensure a SteamVR headset already connected, and are logged into a Resonite UT connected account, this wiki focuses on the RP3 rowing machine, and how to run the Rowing Reimagined demo. First the rowing machine: On the right we can see the RP3 rowing machine, to connect the RP3 machine to the computer you need a mini USB cable. Hopefully there is one attached. The purpose of this cable is to connect the Rowing machine to the computer to pass on rowing statistics for real distance based movement within Resonite. Without connected the RP3 machine to the computer, the VR Rowing boats will not work. The link to download the data connection between the machine and computer can be found at - Download RP3 interface, download and extract both zips, such that you have both RP3.exe and Websocket.exe easily available. (note websocket.exe is only needed for multiple rowers)
- Connect the RP3 machine to your computer by starting RP3.exe, while ensuring the mini usb cable is connected to the RP3 machine/ your computer. To check if this has worked, the screen on the RP3 machine should now be 'on' and show the current time.
- The software dependencies are ready to be setup and connected to the Tundra trackers, to start with the Tundra trackers, simply take them out of the box, ensure there is some charge and click on the only button visible on the device ensuring SteamVR is also running. Similar to how you setup/detected a VR headset with SteamVR, SteamVR will see the trackers and automatically recognize them. Check the troubleshooting for further tips if you have any issues

- The placement of these Tundra Trackers is vital for good tracking within Resonite. If at any point the arms are flying, or the rowing machine is displaced within Resonite, it is due to the trackers. Check the following photos to the right the relevant placement of these Tundra Trackers. You will likely need tape or the included 3D printed mount for the Trackers.
- Next add all the parts of the puzzle together, the following should all be done before progressing, RP3.exe downloaded, SteamVR compatible headset connected, a Resonite UT account linked with the UT universe, 3 connected Tundra trackers.
![]()
![]()

- With everything connected, start Resonite in SteamVR Mode, login to your UT Universe connected Resonite account. Within Resonite navigate: Main Menu –> Inventory –> UT Mixed Reality –> Rowing-Reimagined –> Double click on the Rowing-Reimagned-Final world orb –> exit menu –> Click the world orb in your world –> start as Host/ Create New Server.
- You should now load into the rowing world, from here we need to calibrate our trackers with our virtual rowing machine such that it matches our actual RP3 machine and complete the connection between our RP3.exe interface and the RP3 machine.
- Follow the videos below for how to locate and configure our trackers in our ResoniteVR world.
Using two RP3 setups
Setting up the project with two RP3 machines follows the same process as a single machine setup, with a few additional steps to accommodate the extra equipment:Setting up the project with two RP3 machines follows the same process as a single machine setup, with a few additional steps to accommodate the extra equipment:
Additional Equipment
  RP3 Rowing Machines
  VR Headsets
  Tundra Trackers (3 per rowing machine)
  PC (capable of handling connections for both setups)
Setup Process
* Repeat the initial setup for each RP3 machine.
* Connect three additional Tundra trackers to SteamVR.
* Ensure all trackers are connected to a single PC to avoid connection issues.
* Follow the same steps to connect and configure both RP3 machines and VR headsets.
Troubleshooting
- Issue 1: RP3 Interface Connection issue.
- Solution: Use a new cable, Start Rp3.exe as admin.
- Issue 2: Tundra Trackers keep turning off.
- Solution: The battery is low, charge it.
- Issue 3: Resonite keeps launching is desktop mode.
- Solution: Ensure, on start up your VR headset is connected, select Launch with SteamVR
- Issue 4: The Virtual rowing machines don't move.
- Solution: This is due to a faulty connected between the physical machine and the RP3.exe on your computer. Relaunch/ connect the RP3.exe
- Issue 5: The exe file does not start.
- Solution: You are not using Windows or your laptop blocks the file from starting (university computer). Use another laptop.
- Solution: Another program is open that is connected to the dongle over serial (could be another instance of the demo).
- Issue 6: Issues with the VR player and the virtual rowing machine alignment .
- Solution: More alignment troubleshooting
Detailed Documentation
For more detailed documentation, visit For more detailed documentation, visit detailed documentation..